If you have any questions or dificulities manging your business website, just reach out to our Customer Success Managers!
How to automatically generate an e-signed agreement during checkout and send it to the customer
You can streamline your business processes and save time by getting your clients to sign your conditions online during checkout, which can then automatically generate signed agreements and send them to customers. By automating this task, you can ensure that all necessary documents are accurately created and delivered to your customers.
In this tutorial, we will guide you through the steps to automatically generate an e-signed agreement and send it to the customer using the VEVS Car Rental Software.
To follow along with this tutorial, you will need:
- Access to the VEVS Car Rental Software & Website installation.
- Permission to modify settings, documents, and automated notifications.
- Log in to your VEVS car reservation software.
- Go to the "Settings" menu and navigate to the "Rental Settings" page.
- Select the "Terms" tab.
- Locate the "Accept terms" setting and set it to "Digital Signature." This enables the collection of the customer's signature on the checkout form.
Tip: Make sure to fill in your complete terms of service in the ‘Terms & Conditions’ field, which customers can read and agree to by signing online. You have two options - to display the terms on the checkout page or add a link to the Terms page.
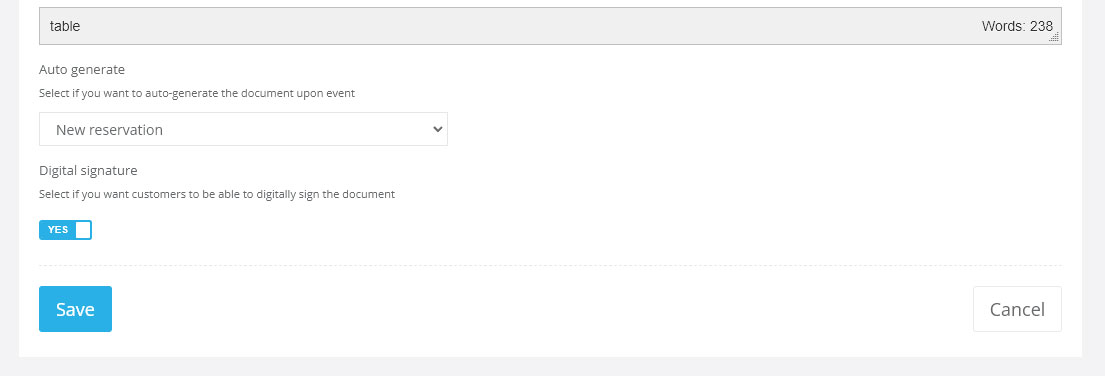
- Go to the "Settings" menu and select the "Documents" submenu.
- Find and edit the "Rental Agreement" template.
- Scroll to the bottom of the document settings.
- Locate the "Auto-generate" option and set it to the "New Reservation" event. This ensures that the agreement document will be generated automatically for each new reservation recorded in the reservation software.
Note: The {RentalTerms} token will display the terms from the ‘Terms & Conditions’ field in the Rental Settings / Terms tab. The same terms are displayed on the Terms page and your checkout and which your clients agree on.
- Access the "Settings" menu in the car rental system and navigate to the "Messages" page.
- Click on the "Automated Notifications" tab.
- Locate the "New reservation confirmation email sent to clients" section and edit it.
- Scroll down to the bottom of the email settings.
- Check the box next to the "Rental Agreement" document to attach it to the confirmation email. This will attach the auto-generated agreement document as PDF in the email sent to customers.

Alternative: If you want to auto-generate an e-signed agreement after a successful online payment and send it to the clients with the payment confirmation email, that is also possible with our car reservation software. Follow the same procedure, but in Step 2 #4, choose the “Reservation prepayment” event. Then follow the same process in Step 3, but search and use the "Payment received confirmation email sent to clients".
By following the steps above, you can automate the process of generating an e-signed agreement and sending it to your customers. The VEVS car rental business software allows you to collect digital signatures on the checkout form, generate an agreement document automatically, and include it in reservation confirmation emails sent to clients. These functions rationalise your business workflow, enhance efficiency and ensure that your customers receive the necessary agreements promptly.
How to collect an e-signature on the checkout form
Collecting customer signatures on the checkout form is an essential step in ensuring agreement and consent. By enabling digital signature functionality in the VEVS car rental booking software, you can streamline the reservation process and make it convenient for customers.
In this tutorial, we will guide you through the steps to enable digital signatures on the checkout form with the VEVS car rental management software.
To follow along with this tutorial, you will need:
- Access to the VEVS Car Rental Software.
- Permission to modify settings related to terms and signatures.
- Log in to the car rental system.
- Locate the "Settings" menu and click on it.
- From the dropdown menu, select the "Rental Settings" page.
- On the "Rental Settings" page, navigate to the "Terms" tab.
-
Look for the "Accept terms" setting.
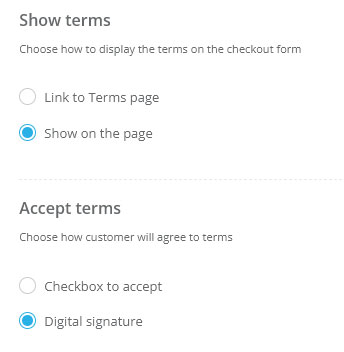
Set the "Accept terms" option to "Digital Signature."
- Enabling this option will activate the digital signature functionality on the checkout form.
You have now activated the Digital Signature field in the Rental Terms section on the checkout form.
- Customers will now see a signature box on the checkout form.
- In this signature box, customers can draw their signature using a mouse, touchpad, or touchscreen device.
- After a customer submits their signature on the checkout form, it will be automatically captured and associated with their profile in your car reservation software.
- The collected signature will be securely stored in the customer's profile data for future reference.
- If you have an auto-generated document set up in the following events: a new reservation is made and an online payment confirmation, the collected signature will automatically be added to it.
For each of those two events, the digital signature from the customer's profile will be included in those auto-generated documents.
- This ensures that the agreement document reflects the customer's signature without any additional manual steps.
- The digital signature on checkout cannot be used in non-auto-generated documents since it is collected to confirm only the reservation details and the terms shown on your checkout form or terms page.
Enabling digital signatures on the checkout form simplifies the process of collecting customer signatures and ensures consent and agreement. By following the steps in this tutorial, you can activate the digital signature functionality in the VEVS car reservation system, allowing customers to provide their signatures directly on the checkout form. The collected signature will be securely stored in the customer's profile and automatically added to auto-generated documents, saving time and effort in agreement management.
How to create and send a document to be digitally signed by clients
With the VEVS Car Rental Software, you can create and send documents to be signed digitally by your customers. That offers a quick and convenient way to obtain client signatures from a distance before the car pickup or after its return.
With the following tutorial, we will guide you through the steps to create a document template, set it up for digital signature, and send it to clients for their electronic signatures using the VEVS car reservation software.
Note that it is a different feature than the digital signature and automated generation of agreement during online checkout. With this tutorial, we will demonstrate how to collect digital signatures from your clients after they make their online reservations.
To follow along with this tutorial, you will need the following:
- Access to the VEVS car rental management system.
- Permission to create and manage documents, as well as edit reservation details.
- Log in to the car booking software.
- Navigate to the "Documents" menu.
- Look for an option to create a new document template.
- Click on the appropriate button to create a new template.
- Fill in the required information, such as the document title, content, and any necessary placeholders for dynamic data.
- Make sure you activate (set to ‘Yes’) the Digital Signature option for a document.
Option A: Send the document to your customers manually
- Go to the "Edit reservation" page for the desired reservation.
- Look for a tab labelled "Documents."
- Click on the "+Other" button to create a new document associated with the reservation.
- From the available document templates, select the one you created earlier.
- Fill in any necessary information or placeholders specific to this reservation.
- Save the document, associating it with the reservation.
- After saving the document, locate it in the list of associated documents for the reservation.
- Look for a "Request signature" link next to the document.
- Click on the "Request signature" link to initiate the process.

- The car rental software will generate an email message containing a link to view the document and sign it digitally.
- The email will be sent to the client's email address associated with the reservation.
- The client can open the email, click on the provided link, and proceed to view and digitally sign the document.
Option B: Send the document to your customers automatically
- Following step 1, on the Edit screen of the document, scroll to the bottom of the document settings.
- Locate the "Auto-generate" option and set it to the event on which you want the document to be generated. This ensures that the car rental system will automatically generate the document on the selected event.
- Access the "Settings" menu in the car rental management system and navigate to the "Messages" page.
- Click on the "Automated Notifications" tab.
- Locate the email message that is triggered on the event you chose for the document or create a new email notification for that event.
- In the Available Tokens section, find the {ViewDocumentURL} and copy&paste it where appropriate into the email message body.
- Then Save. At the selected event, the VEVS Car Rental Software will trigger out automatically the email notification with a link to the document. The link will open the document in web format (in a web browser) with a digital signature option.
By following the steps outlined in this tutorial, you can easily create a document template, configure it for digital signature, and send it to clients for their electronic signatures. The VEVS car rental reservation system allows you to seamlessly manage the process from document creation to requesting signatures, saving time and effort. Embracing digital signatures enhances the efficiency and convenience of obtaining client signatures while maintaining a secure and streamlined workflow.
How to Download a Document as a PDF File
Downloading documents as PDF files provides a convenient way to share them with clients, use them offline or keep a hard copy of them.
In this tutorial, we will guide you through two methods of downloading a document as a PDF file using the VEVS car rental system. You can either download the document manually from the Edit Reservation page or send it as a PDF attachment via email.
To follow along with this tutorial, you will need:
- Access to the VEVS Car Rental Software.
- Permission to edit reservation details and manage documents.
Method 1: Manually Downloading a Document as a PDF File
- Log in to the car rental system.
- Navigate to the desired reservation that contains the document you wish to download.
- Click on the "Edit Reservation" page to access the reservation details.
- On the Edit Reservation page, look for a tab labelled "Documents" and click on it.
- A list of documents associated with the reservation will be displayed.
- Locate the document you want to download from the list.
- Look for a PDF icon or a download button associated with the document.
- Click on the PDF icon or the download button.
- The document will be downloaded as a PDF file to your local device.

Method 2: Sending the Document as a PDF File via Email
- Locate the document you wish to send as a PDF file from the list of documents on the Edit Reservation page.
- Look for an email icon or a button associated with the document.
- Click on the email icon or button to initiate the email option.
- A pop-up window will appear, displaying an email message.
- Compose the email message as desired, including the recipient's email address and any necessary content.
- Check the ‘Attach Document PDF’ field to make sure that the selected document is attached to the email message as a PDF file.

- After verifying the email content and attached document, click on the "Send" button or a similar option.
- The email message will be sent to the client or recipient, with the document attached as a PDF file.
Downloading documents as PDF files from the VEVS car rental management software is straightforward and offers flexibility in sharing and storing important documents.
Understanding Document Templates and Creating Customized Ones
Document templates are powerful tools that streamline the process of creating personalised documents for each reservation and digitalising the process.
By utilising data tokens within the document text, reservation-specific information can be automatically inserted into the documents you generate and use for serving your clients.
In this article, we will explore the concept of document templates and guide you through the process of creating new templates, enabling you to generate professional and personalised documents efficiently.
What are Document Templates in the VEVS Car Rental Software? Document templates are predefined documents that serve as a framework for generating personalised documents for each reservation. These templates allow for consistency in document creation while dynamically populating reservation-specific information. By using data tokens within the document text, these placeholders are replaced with actual data when generating the document.
Creating a New Document Template: To create a new document template, follow these steps:
- Access the Document Creation: Go to the VEVS car rental management system and navigate to the "Settings" menu. From there, select the "Documents" option.
- Adding a New Document: Click on the "Add document" button to create a new document template.
- Title and Content: Provide a descriptive title for the document template. This title helps identify the document's purpose and content. Next, enter the desired content for the document body, including any necessary text, formatting, and data tokens.
-
Utilising Data Tokens: Data tokens are placeholders within the document that will be replaced with actual reservation data when generating the document. For example, using {Name} as a data token will automatically insert the customer's name from the reservation. These tokens can be inserted wherever reservation-specific data is needed in the document.
Example: Let's say you have a reservation from customer John Smith. To personalise the document, you can add a data token like {Name} within the document's body. When using this template for John Smith's reservation, the {Name} token will be automatically replaced with "John Smith".
Note: You will find a list of tokens in the ‘Available tokens’ section on the Edit Document screen. You must copy and use each token precisely as it is listed so they can work. If you change the token wording or anything, it will stop working. This is why we advise copy&paste tokens from the list instead of writing them.
- Configuring Auto-Generation (Optional): If you want the document to be automatically generated for specific events, such as reservation creation, enable the "Auto-generate" option. This feature eliminates the need for manual document generation, saving time and effort.
- Enabling Digital Signature (Optional): The "Digital Signature" option allows you to specify if the document can be signed digitally. If required, enable this option to enable clients to sign the document electronically.
Document templates are a valuable tool in rental management that simplifies the process of generating personalised documents for each reservation. By creating templates with data tokens and utilising features like auto-generation and digital signatures, businesses can streamline their documentation workflow and ensure consistency. Follow the steps outlined in this article to create customised document templates and enjoy the benefits of efficient and professional document generation that the VEVS car rental booking software provides.
Understanding the {Signature} Token and its Functionality
In the VEVS Car Rental Software, the {Signature} token plays a crucial role in handling signatures within documents. How the {Signature} token works depend on the document settings and whether digital signature functionality is enabled.
In this article, we will explore how the {Signature} token works and its implications in document management.
Understanding the {Signature} Token: The {Signature} token serves as a placeholder within documents, specifically for capturing signatures. Its behaviour varies based on the document settings and the presence of digital signature functionality.

- Document Allowing Digital Signature: If a document is configured to allow digital signatures, the {Signature} token will be replaced by "__________ or sign digitally." This indicates that when the document is viewed online (in a browser), customers can click on the ‘sign digitally’ link and sign the document electronically. On click, the signature capture process is initiated, enabling customers to provide their digital signatures within the document.
- Document Not Allowing Digital Signature: If a document does not allow digital signatures, the {Signature} token will only be replaced by "_____________." In this case, the document is meant to be signed offline.

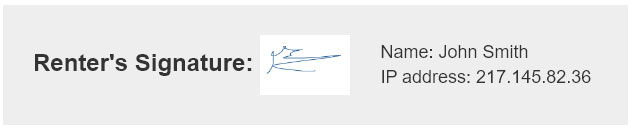
Replacement of {Signature} Token: Once a document is digitally signed by the customer, the {Signature} token is replaced by the actual signature image within the document. This ensures that the document reflects the customer's signature for verification purposes.
Additional Signature Tokens: In addition to the {Signature} token, two more tokens are available:
- {SignatureName}: This token is replaced by the name of the person who signed the document, providing identification for the signature.
- {SignatureIPAddress}: This token is replaced by the IP address of the person who signed the document, adding an extra layer of verification and tracking.
Implications of Signature Collection on the Checkout Form: If you collect signatures during online reservation checkout and have an auto-generated document with a digital signature enabled, the whole process of signing a document becomes seamless. When a reservation is made, the document will be automatically created and signed using the captured signature.
However, it's important to note that if you generate the same document manually after the reservation is recorded, the signature collected on the checkout form will not be automatically applied. Customers will need to sign those documents to ensure their agreement and consent. Still, you can send them via email to collect their signature digitally.
The {Signature} token plays a vital role in managing signatures within documents in the VEVS Car Rental Software. By understanding its behaviour and document settings, businesses can effectively capture and track digital or offline signatures. Whether allowing digital signatures or requiring manual signing, the {Signature} token ensures accurate representation and enhances the document management process for businesses and customers alike.