If you have any questions or dificulities manging your business website, just reach out to our Customer Success Managers!
How to configure the Date and Time formats
By default, all VEVS websites display dates in the format d.m.Y (date.month.Year) - 15.09.2017, and times in the format H:i (15:42). The standard Timezone is set to UTC (Coordinated Universal Time) which is the same as GMT (Greenwich Mean Time). However, you can customize all of these settings for your own business site. To do this, follow these simple steps:
1) Log into your Website's Admin Page
2) Go to Website Settings / General Options

- Set "Date format"
Review the available date order display formats and select the one that fits your preferences. - Set "Time format"
You can select a 12-hour based or 24-hour based time format from the dropdown menu. The options with an AM suffix after the sample time are 12-hour based and all others are 24-hour based. - Set "Timezone"
Select your preferred Timezone from the list with available GMT (UTC) offsets. - Set "First day of the week"
Select the day the week starts with in your country. Monday is the first day of the week according to the international standard ISO 8601, but in the US, Canada, and Japan, for example, the first day of the week is Sunday.
3) Click "Save" to confirm the changes. The new date and time settings will take effect immediately.
How to set the Currency and Price format
Our business websites support all world's official currencies and allow users to configure the position of the currency's symbol/abbreviation. To set your default currency and preferred Price format, just follow these steps:
1) Log into your Website's Admin page
2) Go to Website Settings / General Options
- Set "Currency"
Select your preferred currency (depending on the country your business is registered in) by choosing its International Abbreviation Code. - Set "Price format"
You can select the thousands separator (comma or space) or show the amount as a price with decimal numbers indicating cents, pence, etc. or without if you only have rounded prices. - Set "Currency symbol position"
Select where the Currency symbol should appear - before or after the price amount.
How to obtain and set up Google Maps API key on your website
All VEVS website solutions use Google Maps where a map is displayed and an address is located. According to the latest changes introduced by Google, to use Google Maps on your website, you need to obtain an API key.
For more information - check the Google Maps Pricing Info and Pricing Table.
Google Maps requires a special Google Maps browser key. Without this key, you cannot display Google Maps on your website. Before you can set this browser key in your VEVS Website you'll need to generate it. This tutorial will show you how to do that.
Generate a new API key
- Go to the Google Maps Platform
- Click 'Get Started'
- Check 'Maps', 'Routes' and 'Places' and click 'Continue'

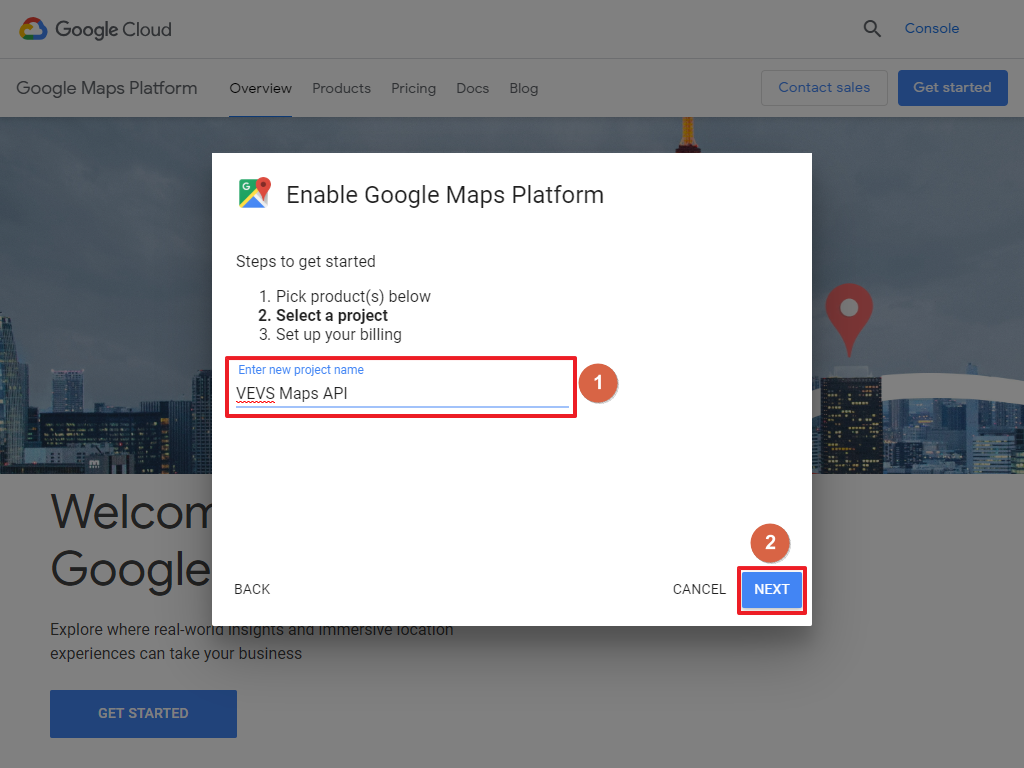
- If you want to use an existing project, please select it from the list. Otherwise, select 'Create a new project' and enter a project name. Click 'Next' to continue
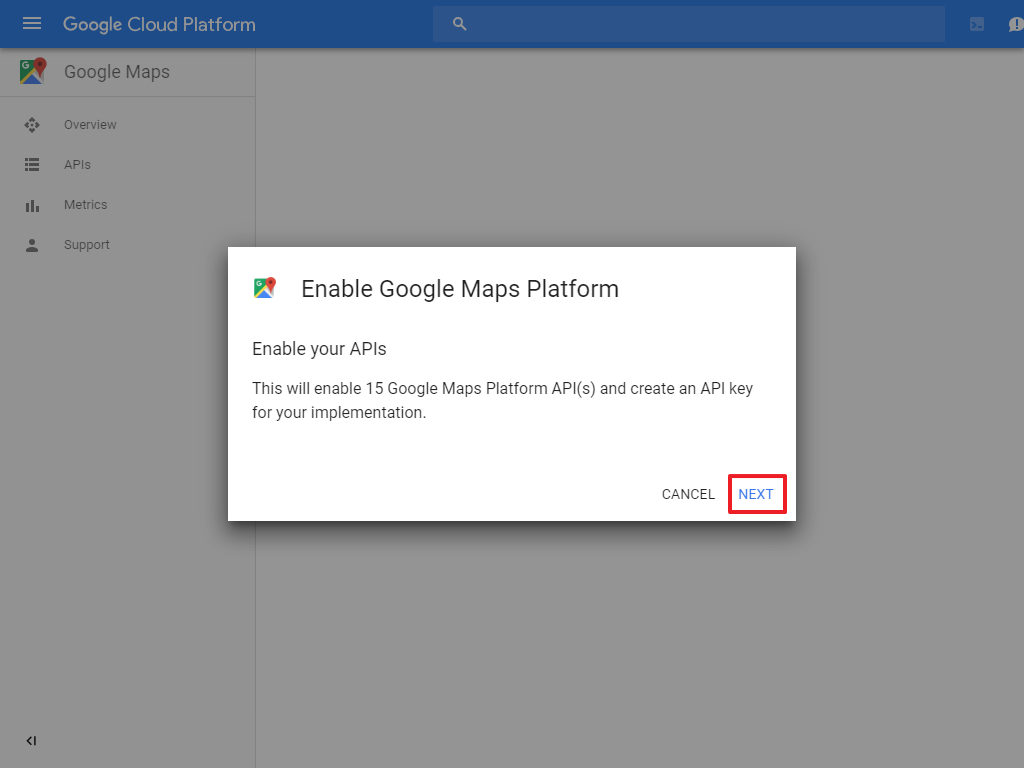
- Click 'Next' to enable the APIs for the project.
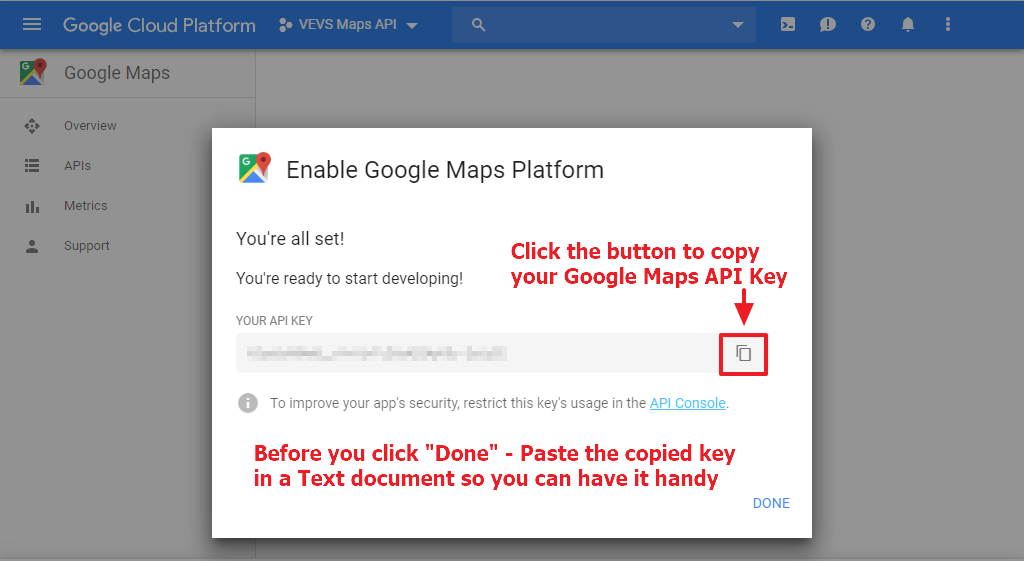
- Copy the generated API key from the popup, you'll need this to set your key on the Website Admin Page later.


View your existing API keys
- Go to the Google Maps Platform Dashboard
- If the side menu is not visible, click the three line (hamburger) menu icon
- Click 'APIs & Services' (API icon)
- Click ' Credentials' (Key icon)
Set up the Google Maps API key on the VEVS Website
- Go to your VEVS Website (CMS) Admin page
- Expand the Website Settings menu and click on the General Options menu
- Paste the Google Maps API Key in the dedicated field for it (make sure there are no blank spaces in front or after the pasted key)
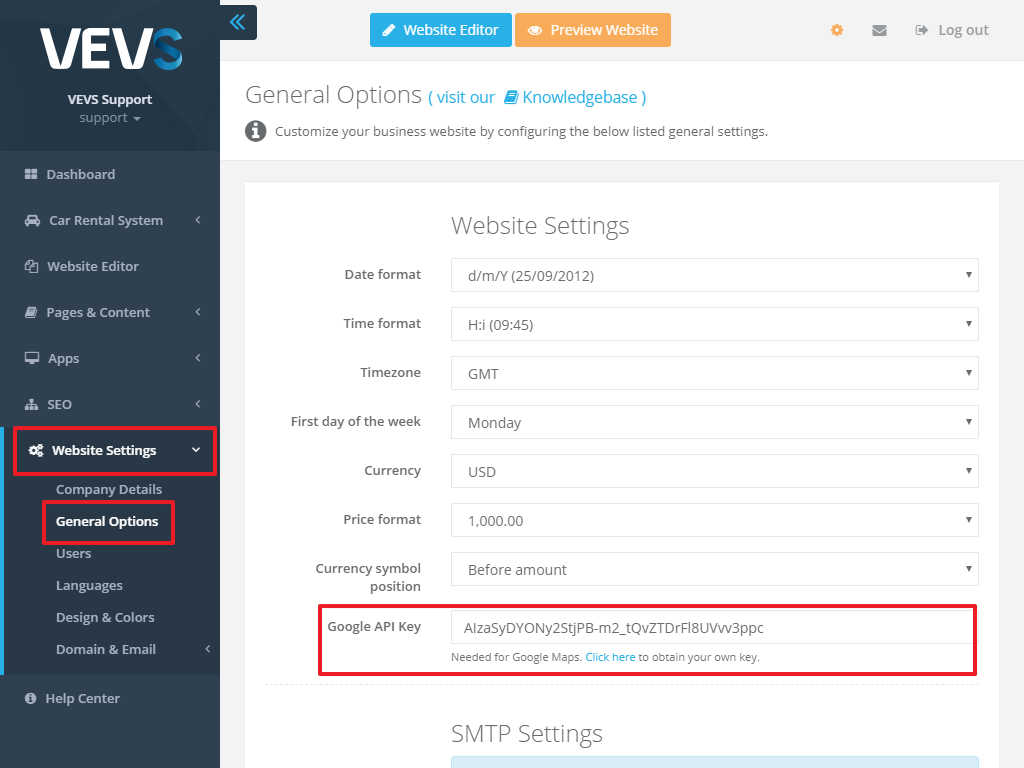
- Click "Save"

Simple Mail Transfer Protocol (SMTP) settings
While your website installation is not yet transferred to its own domain name, the automated email notifications from the VEVS CMS are being sent from the email "noreply@vevs.com" with "Reply-to:" set to "your.admin@email.com" (the email that you have set as a master admin of the website).
In this case, some SPAM filters might reject the automated emails that our system sends or mark them as SPAM and move them to the JUNK or SPAM folder. Some SPAM filters do not "like" emails sent from one email account (e.g. noreply@vevs.com) on someone else's behalf.
Once your website is transferred to your own domain name, the system will require you to specify the email from which the notification emails will be sent, otherwise no email notifications will be sent from your website.
To do so, go to your Admin Page / Website Settings / General Options and complete your email account details: SMTP Host, SMTP Port, SMTP Username, SMTP Password.
Email address ("From" header) needs to be filled in, too. Enter the email to which you wish to receive customer replies to your system emails.
SMTP Auth Type - select the correct SMTP Auth type if needed. Otherwise, leave it to the default option.
See the example below for more information and find a list of the most common email provider's SMTP settings. If your email provider is not among the listed ones, please contact them and ask for the correct SMTP details.

In both cases (PHP mail or SMTP), if your customers reply to your automated email notifications, you will receive the message in your email box.
The most popular email providers and their SMTP settings:
Gmail SMTP server
SMTP Host: ssl://smtp.gmail.com
SMTP Port: 465
SMTP Username: your full email address
SMTP Password: your email account password
Important Note:
To allow the access to your Gmail account, you will have to log into the email that you have set up in the SMTP Username and then visit the following link:
https://accounts.google.com/DisplayUnlockCaptcha
You can also follow the instructions in the next question "Allow the website to send notification emails through your Gmail account" to set up your Gmail account.
Office365 SMTP server
SMTP Host: tls://smtp.office365.com
SMTP Port: 587
SMTP Username: your full email address
SMTP Password: your email account password
Yahoo SMTP server
SMTP Host: ssl://smtp.mail.yahoo.com
SMTP Port: 465
SMTP Username: your full email address
SMTP Password: your email account password
Hotmail/Live SMTP server
SMTP Host: tls://smtp.live.com
SMTP Port: 587
SMTP Username: your full email address
SMTP Password: your email account password
AOL SMTP server
SMTP Host: smtp.aol.com
SMTP Port: 25
SMTP Username: your full email address
SMTP Password: your email account password
VEVS SMTP server (if your emails are created after Dec 2019)
Host: ssl://clients.vevs.website
SMTP Port: 465
SMTP Username: your full email address
SMTP Password: your email account password
VEVS SMTP server (if your emails are created before Dec 2019)
Host: ssl://webmail.vevs.com
SMTP Port: 465
SMTP Username: your full email address
SMTP Password: your email account password
Allow the website to send notification emails through your Gmail account
To enable your VEVS website to send email notifications on your behalf via your Gmail account, there is one additional process you have to go through in line with Google's extra security measures:
1) Go to the following link and log into your Gmail account:
https://myaccount.google.com/security
2) If the 2-Step Verification is set to ON, click on "App passwords".
2.1 When the page opens select "Other (Custom name)" from the "Select app" dropdown menu.
2.2 Type a name of your choice in the text box and press the Generate button.
2.3 A new window will pop up - it will contain the 16-character password you can use instead of the password for your Google account to allow the apps and services (in your case, your VEVS website) to pass the 2-Step Google Verification.
Just copy the password from that window and paste it in your website's SMTP password settings in the place of your Google Account password.
3) If the 2-Step Verification is set to OFF
3.1 Scroll down to the bottom of the page until you reach the "Allow less secure apps" box and set it to ON.

Allow less secure apps for your Google Suite email account
If you are using an email for your domain name (email@domain.com) that is managed by Google Suite - then you may need to proceed with a few more steps to enable the option "Allow less secure apps" for your email account.
Follow the steps below to proceed and set the "Allow less secure apps" option available for each of the email accounts that you manage via Google Suite:
-
Sign in to your Google Admin console.
Sign in using your Google Suite administrator account
- Click Security > Basic settings.
Where is it? - Under Less secure apps, select Go to settings for less secure apps.
- In the subwindow, select the Allow users to manage their access to less secure apps radio button.
Once you've set the setting Allow users to manage their access to less secure apps to On, affected users within the selected group or Organizational Unit will be able to toggle access for less secure apps On or Off themselves.


